
Within the world of weddings—specifically bridal fashion—it’s imperative that the right size is ordered and the correct alterations are made. And without the proper measurements, the necessary task of choosing a dress can quickly go awry.
If you aren’t ordering through a bridal boutique with professionals to take your measurements, you’ll need to know the correct way to use your measuring tape. Sizing is already an entirely different experience when it comes to the style of the bride, so allow us to make it a pinch easier for you to manage. Take a peek at these quick tips and tricks for getting every inch just right!
Before you start measuring this length and that width, make sure to read through all the essential steps below and learn the proper way to ensure the right sizing and fit.
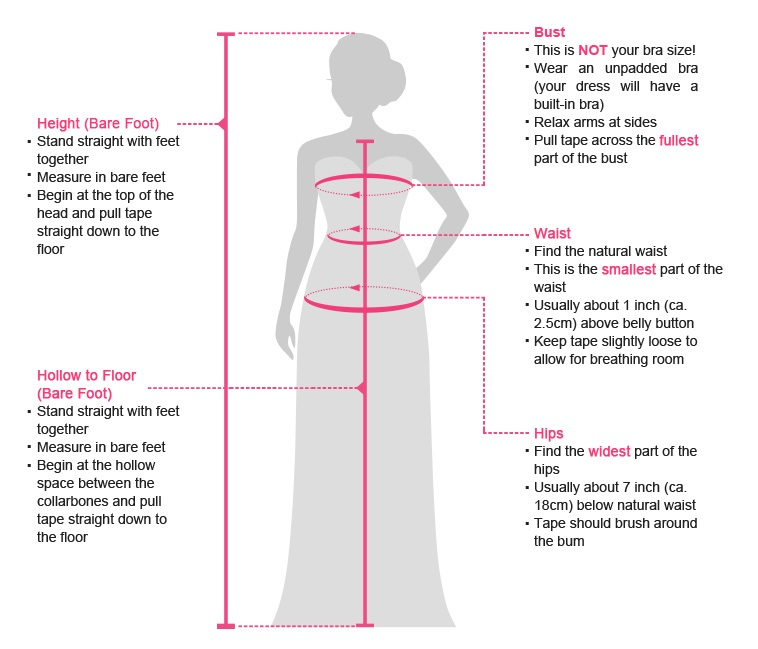
Bust
Your bust measurement will be the circumferences of the fullest part of your chest. The measuring tape will circulate from the front to the back, and it will usually cross through the nipples. It’s vital that you measure the fullest part of your bust area for the best and closest fit.
Waist
When taking your waist measurement, you’ll be doing the opposite of the bust. Instead of the fullest part of your waist, you want to find the most narrow.
The belly button is the usual spot for finding your true waist measurement. Again, this will be the circumference of the area, and the measuring tape should go from the front to the back to find the correct measurement.
Hips
Now we move onto the hips, and we’re looking for fullness again. You will want to take the circumference of the fullest part of your hip area—from the front, circulating all the way around the back with the measuring tape to ensure the most accurate measurement.
Back Width
You may need this measurement for custom gowns, for example. And it’s a simple one! This measurement is simply the horizontal distance of the widest section of the back.
Shoulder Width
This measurement is a “tip to tip.” And all that means is that you need to measure from the top tip of one shoulder all the way across to the other for the proper measurement. It’s important that you keep the tape held taut, as well.
Front/Back Length
Your front length will help with torso fittings. This is the vertical distance between the baseline of your neck to the top of your waistline.
Hollow-to-Hem
One of the most interesting of the bunch is this measurement as it’s not always taken for evening gowns but should be. This measurement will ensure that the distance between the base of the neck to the hem of the dress is just right. *It’s important to note that with heels on, a properly fitted gown’s hem will just graze the floor.
Additional Tips and Tricks to Correctly Measure Your Wedding Dress
- Do not measure a dress you’re wearing yourself. Make sure you have someone with you to ensure you are getting the proper measurements.
- Stand straight, shoulders back, and heels together. Slouching or having your feet apart will create inaccurate sizing.
- Four measurements are always required: Bust, Waist, Hips, and Hollow-to-Hem.
- Wear shoes. Wear the shoes you want to wear on your big day (or at least with the same heel height).
- Wear undergarments too. The proper undergarments ensure a proper fit and will ensure a better measurement too.
- Think about getting a pro. If you don’t have another person or you’re worried about messing up, you can always hire a professional tailor or alterations specialist to do the measuring for you.
- Anticipate any growth you may have. For example, are you pregnant? Make sure you account for this type of fluctuation in sizing.
- Parallel to the floor is the key. Think about the measuring tape like a level—you don’t want it diagonal or the picture will fall (and the dress won’t fit!).
- Use the size chart. Each and every designer will have their own sizing chart on their website. It’s important for you to go by the specific designer you have chosen since bridalwear fluctuates so deeply. And if you’re between sizes? Go with the larger choice and alter down.
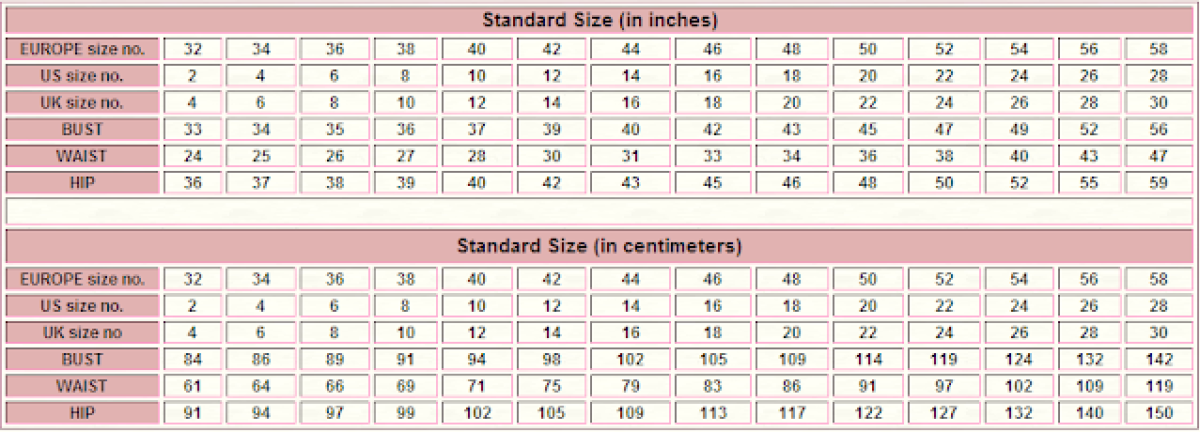
Using Your Designer’s Size Chart
As mentioned previously, every designer will have their own size chart. It’s imperative to get your correct measurements, and then compare them to the size chart of whatever brand you are purchasing from.
Once you have your numbers, consult the chart and find the size that will work. Here’s the process in 4 easy steps:
Step 1: Compare your bust, waist, and hip measurements to the size chart.
Step 2: Find your measurements on the chart. Say, for example, you see that your bust fits a 10, your waist fits an 8, and your hips fit a 12.
Step 3: Order up to a 12, and size the rest down to get a custom fit for your shape.
Step 4: Don’t be surprised by the size you end up ordering—more often than not, brides will be ordering 2–3 sizes above their normal, everyday clothes.